The Chronicles of Strength
Become More
Become More
Why Kettlebells?

- Train strength, explosiveness, flexibility, and endurance all at once
- Forge a lean, muscular physique
- Develop all-around "functional" strength
- Learn proper athletic movement, and how to protect your joints
When All Else Fails, The Kettlebell PrevailS
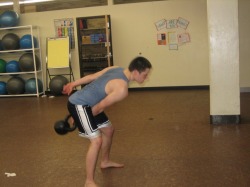
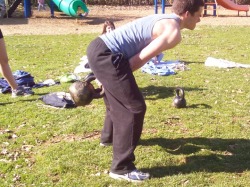
The Kettlebell Swing
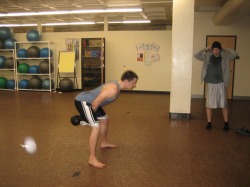
Proper Hip Hindge and Flat Back
The kettlebell swing is the foundation of all kettlebell exercises. This technique should be the first kettlebell technique learned, and must be absolutely perfected before any kettlebell practitioner moves onto other kettlebell exercises. The swing itself is an incredible fat burner, a remarkable conditioner, and will help you build an incredible amount of explosiveness by developing your hamstrings, butt, and lower back muscles.
Key Aspects of the Kettlebell Swing
Key Aspects of the Kettlebell Swing
- Your back is flat, and your head stays inline with your spine throughout the movement
- Your weight is on the heels of your feet, and your knees stay in line with your toes (they never collapse inward or extend outward)
- You engage your lats(back and armpit muscles) to keep your shoulder pulled back and down into its socket
- There is no forward knee movement, your knees bend only as much as your butt goes back
- This is not an arm exercise! Your butt, hamstrings, and lower back power the movement entirely, your arms never lift the bell
- You stand straight up at the top of the swing, never leaning backwards. Your knees and hips are locked out as well
- Swing high! The kettlebell handle never passes below the knees
- The kettlebell is placed approximately a foot in front of you
- Assume a natural squat stance, feet placed approximately shoulder width apart
- Hinge at the hips and push your butt back and down as if you are trying to sit on a bench that is just out of reach, remember all our weight is on your heels. And keep your back flat, never rounded!
- Once you are in this proper deadlift position(Butt back, Hinged at the hips, knees bent but not forward, chest out, shoulders pulled back and down), place both hands on the bell
- To initiate the back-swing, engage your lats and hike the bell back between your legs as if you are trying to hit yourself in the butt with it
- Remember to keep the swing high and close to your groin, never does the handle of the bell pass below your knees, this will compromise your flat back.
- At the maximum height of the back-swing, forcefully contract your glutes(butt) and stand straight up as fast as possible, locking out your hips and knees.
- This will propel the bell forward and up, remember to keep your shoulders pulled back.
- As the bell approaches chest height, start to actively throw the bell down forcefully back into into the back-swing
- Last note: Keep your eyes focused on the horizon(where the wall meets the floor) at all times. This will help to keep your neck and head inline with your spine.
- Rinse and Repeat
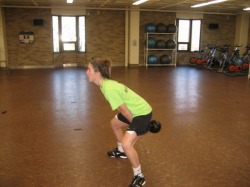
Melissa demonstrating true explosiveness
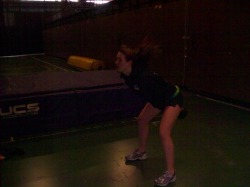
Danielle Swinging Hardstyle
Clayton locked out nicely at the top of a swing
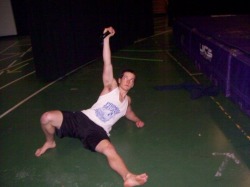
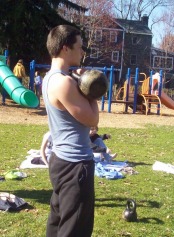
The One-Arm Swing
Top of the backswing, fight the rotation as much as possible
Although it may not seem like it, the one-arm swing or the one-hand swing is a completely different ball game. It offers its own unique benefits, mostly in part due to the strength required to handle an asymmetrical load throughout a ballistic movement. Swinging the kettlebell with only one arm will make your body want to twist or rotate to compensate for the lack of weight on your other side, which you don't want to happen. The first couple of times you perform the one arm swing, especially if it is with the same weight that you use for the two arm swing, you will notice that the bell also wants to pull your shoulder out of its socket. It is through engaging your lat that you will learn to keep your shoulder pulled down and back, and through tension that you will learn to fight the rotation and keep your body square. In a perfect world, your one-armed swing should look identical to your standard swing, with the only exception being that your only using one arm!
Key Aspects of the One-Arm Swing
Key Aspects of the One-Arm Swing
- Everything should be exactly the same as your standard two handed swing
- Keep your lat tight and your working shoulder pulled down and back
- Do not let the bell rotate or twist your body on either the up or down portion of the swing
- Stay square and keep your chest forward
- Set up exactly how you would for a standard swing
- Now, only grasp the bell with one hand, preferably grabbing the center of the handle
- Hike the bell back forcefully as you would with a normal swing, but now you may also rotate your first inward and your elbow out to fit the handle between your legs. The thumb will rotate toward your body on the backswing, and will rotate until parallel with the ground on the upswing. The rotation of the fist is optional, and should only be needed with heavier bells.
- Throughout the movement keep your shoulder pulled back and down by keeping your lat tense
- Do not let the bell rotate your body and do not collapse your chest. Stay square as if you were performing a standard swing.
- Everything else is exactly the same as your standard kettlebell swing. Enjoy!
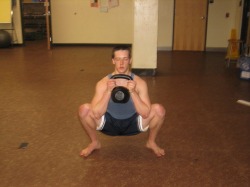
The Goblet Squat

Notice the back is flat and vertical
The goblet squat is a great squat variation know for its simplicity and effectiveness. Don't listen to nonsense about never squatting past ninety. If you want to get strong, then you have to squat past ninety, theres no way around that. Of course, if you don't squat properly and you try to squat past ninety then you are setting yourself up for injury. This is where the goblet squat comes in. This exercise will not only teach your the proper full range of motion involved in a squat, but will also help you to open up your hips and build tremendous glute and quad strength.
Key Aspects of the Goblet Squat
Key Aspects of the Goblet Squat
- Back is flat, spine is elongated
- Your heels are firmly rooted to the ground and supporting all of your weight
- Your knees must remain inline with your toes, and may never collapse inward
- The descent is initiated by actively "pulling" yourself between your legs
- The hips ascend simultaneously with your shoulders and back
- Your knees and hips are locked out at the tops
- Assume a squat stance about shoulder width or a little wider. You will need enough room to squat down between your legs, and a narrow stance makes this impossible.
- The kettlebell is held by the "horns"(the sides of the handle) and is placed against the chest
- Start your squat descent by pushing your butt back and using your hip flexor muscles to actively pull yourself down between your legs. As you descend, your knees do not move forward, but rather away form each other to make space for you to fit between them.
- As you break parallel begin to slide your elbows against the inside of your knees, more specifically against your VM(vastus medialis) muscles or inner quads. Also, begin to elongate your spine by pushing your tailbone outward and downward, and the top of your head up.
- Once you have reaching the bottom position, continue to try and sink deeper and deeper into your squat. Really try and sink your butt even lower as if you were trying to sit on a very, very low curb.
- Also while in the bottom position, use your elbows to press your knees outward to open up your hips (your stance will begin to look as if it very wide, almost like a sumo wrestler, this is ok). You may also shift your weight from leg to leg, rocking and wiggling form side to side, to get an even deeper stretch. Visualize trying to pry your hips out of their sockets and making your pelvis wider
- After prying your hips open for a few moments you may start the ascent by forcefully contracting your glutes and driving your heels into the ground as hard as possible.
- Be sure that your hips do not ascend fast that your back and shouders, everything must come up simultaneously
- Lock out your knees and hips at the top position and stand completely erect.
- That's the goblet squat, and once you develop the hip flexibility you will obviously not need to hold the bottom position for quite as long or spend as much time prying your hips open.
Bottom position of the goblet squat
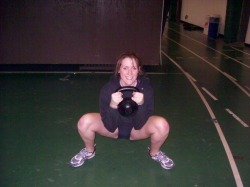
Sink that butt as low as you can
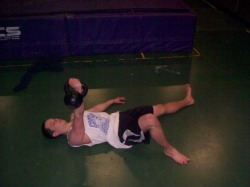
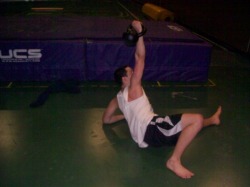
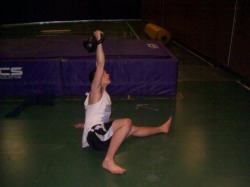
The Snatch
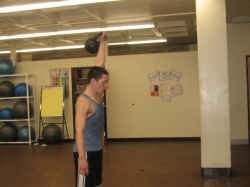
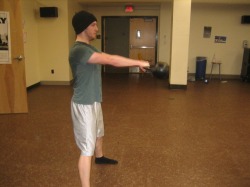
Overhead lockout position
The almighty snatch. The king of all kettlebell techniques. No other exercise develops as much explosiveness as the snatch. Do not even attempt the snatch until you have both the swing and the one-arm swing mastered. This is an advanced technique, and if not executed properly, can lead to injury. But do not fear the snatch, because with proper form, there is no better exercise for burning fat, building explosive power, and increasing your endurance. The snatch will make a better man out of you, regardless even if you are a woman or a child. If you choose not to snatch, you choose not to maximize your true potential. And if you choose not to maximize your true potential, you will never become able-bodied. The point of the snatch is to get the bell locked out overhead in a ballistic and explosive manner, but you will quickly realize its not all that simple.
Key Aspects of the Snatch
Key Aspects of the Snatch
- The bell is accelerated by your hips, this is not an arm movement
- Your arms simply redirect the force of the bell upward
- The snatch is really just a maximum height high pull, finished with a quick "spearing" of the hand through the bell
- The final overhead position should include a fully locked out elbow, with your bicep lined up with your ear or slightly behind it.
- Make the rotation of the bell around your hand as fast and as smooth as possible to avoid it crashing painfully into your wrist, you will accomplish this by beating the bell to the chase and spearing though at the top with a loose grip
- Keep your wrist straight at all times, do not let the weight of the bell bend your wrist backwards
- The descend is initiated by throwing the bell towards your stomach like an overhand softball throw
- Assume a one-hand swing position and hike the bell back as forcefully as possible to load maximum tension throughout your hamstrings, butt, and lower back
- Unload that tension by clenching your glutes as hard as possible and driving your hips foward
- As the bell begins to accelerate forward you will begin the high pull movement by drawing the bell back as if you are trying to elbow someone behind you in the face
- Remember that your hips accelerate the bell upward, your arm is just drawing it back, closer to your body
- Continue to draw the bell back and up, leading with your elbow
- Your want to pull the bell up as high as possible before you begin to open your hand and spear through the bell to finish the snatch, so be sure to draw your elbow past your body and above your shoulder (much like as if you were drawing a bow and arrow)
- Once you have reached the maximum height of the high pull and you have snapped your hips into the locked out position, immediately finish the movement by loosening your grip on the bell, opening your hand, and punching through into the locked out position. This is known as "spearing through the bell.
- This "spearing" through the bell will accelerate it quickly around your wrist and you should finish with your elbow locked out and your bicep lined up next to your ear or slightly behind it. Also remember to keep your shoulder down and back like you would during a swing, it should not be hunched upward even in the overhead locked out position.
- The descent is sometimes the hardest part for a lot of people. In order to save yourself from a lot of frustration and pain in the future, you must learn to throw the bell from the heel of your hand and to re-catch it in the hook of your fingers, so that the bell bypasses the callused portion of your hands. This will save you from tearing your calluses, which is never a good thing, because torn calluses mean lost time when it comes to practicing snatches.
- So to start the descent, really think about throwing the bell towards your stomach, much like an overhand baseball or softball throw. The reason you want to throw it toward your stomach is so that the bell stays close to your body on the way down, you do not want the bell outward in a big arc like motion, because it will end up pulling you off balance or pulling your shoulder out of its socket.
- Once you have thrown the bell, you are releasing it from your grip for a split second, so that the handle travels from the heel of your palm, over the callused portion of your hands, and is re-caught in the hook of your fingers. The re-catching of the ball should occur at about eye level. Once you have secured the bell in the hook of your fingers begin to draw your elbow in close to your side so that the bell remains close to your body for the remainder of the descent.
- Continue to keep your elbow in close and guide the bell back into a full backswing so that you may load tension for another rep
- The throwing of the bell is not only to help save you from callus tears, but also to help speed up the eccentric or negative part of the snatch so that you are able to load more tension during the backswing to help power the next rep.
- The snatch takes a while to learn, and even longer to master. Train smart with the snatch, and if something doesn't feel right then abort!
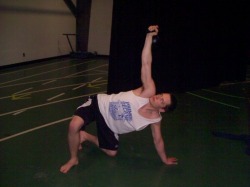
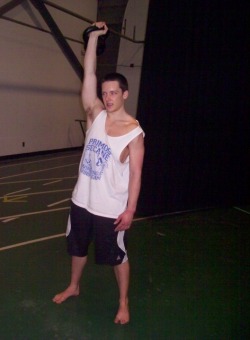
The Turkish Get-Up

This is an exercise that you will rarely ever see anyone performing in a typical gym, which is a shame because the turkish get-up(TGU) is one of the best exercises for developing power, stability, and coordination. Not to mention that this exercise does wonders for your shoulders, working them through almost their entire range of motion. The objective of this exercise is simple, stand up while holding a weight over head. The execution, however, is much more complicated and your form must be strict. I like to break down this technique into 7 steps: The Set-Up, The Forearm Position, Hand Position, High Bridge, Sweep, Lunge, and the Stand-Up.
The Set-Up: The Set Up is very important, if not performed properly, you could easily injure your neck, shoulder, or even drop the bell on your head. The first thing you need to do is lay down next to your kettlebell. You will then roll to your side, into a fetal position, and grasp the kettlebell with two hands. The hand you will be performing the TGU with should come underneath the handle and your free hand will grasp the top of your working hand.
The Set-Up: The Set Up is very important, if not performed properly, you could easily injure your neck, shoulder, or even drop the bell on your head. The first thing you need to do is lay down next to your kettlebell. You will then roll to your side, into a fetal position, and grasp the kettlebell with two hands. The hand you will be performing the TGU with should come underneath the handle and your free hand will grasp the top of your working hand.

Once you have a secure grasp on the bell, keep the bell close to your body and roll onto your back. The bell should be resting on your forearm. Now, press the bell up with two hands until your elbow is fully locked out. Make sure to keep your lat tight and keep your working shoulder pull down and back. To finish the set up, you need to fully extend your free arm and leg out at about a 45 degree angle form your body(The arm and leg should run parallel). Bend the leg on your working side and plant your heel firmly on the ground as shown below, also angling this leg at about a 45 degree angle form your body, but in the opposite direction of your other leg. Remember to maintain a straight wrist while supporting the kettlebell overhead, Your knuckles should be lined up directly with the bones in your forearms.
The Forearm Position: The objective of this step is to get up onto the forearm of your free arm. To do this, you need to push off your planted heel, pull with the elbow of your free arm, contract your abs forcefully, and roll up onto your forearm. Keep your eyes on the bell throughout the entire movement, and punch the bell up to the ceiling. Don't forget to use your planted heel and opposite elbow to help get you up, if you try to rely solely on the power of your abs, you will eventually fail once you start using heavier bells.
The Hand Position: This is the easiest transition involved in the movement. All you have to do here, is move from your forearm up to your hand, by straightening your arm. Continue to use your heel and abs to help propel you upward, lock out your elbow, and come up onto your hand. You will want to rotate your hand so that your fingers are pointing behind you, but try your best not to lift your hand off from the ground.
The High Bridge: This portion of the exercise is done by pushing off your planted heel, squeezing your glutes, and driving your hips up into a bridged position. Keep your abs and glutes tight throughout the movement, and keep your eyes focused on the bell at all times.

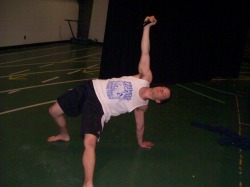
The Sweep: This part usually confuses people the first time they attempt a turkish get up, but really its quite simple, yet people often tend to make things much more complicated then they need to be. To execute the sweep, you lift your free leg off the ground, and sweep it under your body and plant your knee in line with your planted hand. The your legs should run perpendicular to each other in the finished position of the sweep, not parallel like in they will in the lunge position. Make sure to sweep your leg back far enough to plant your knee in line with your hand, sweeping your leg back to short will make it very difficult to come into a proper lunge position. Again, keep looking up at the bell throughout this movement.
The Lunge Position: To transition from the sweep into the lunge position, you will rotate your back leg roughly 90 degrees outward, so that your knee is now pointing in the same direction as your front leg, while simultaneously bringing your body into an upright position. This entire movement is initiated from the hips, and you should finish with the bell locked out in an over head pressing position. Once you have reached the lunge position, you may now take your eyes off the bell and look straight ahead.
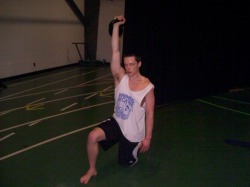
Stand Up: To complete the turkish get up, all you have to do is execute a simple lunge while keep the bell locked out over head. Squeeze your glutes and abs forcefully and push off your front heel to propel you upward. Now all you have to do is get back down, simply reverse all of the movements you have just performed, and remember to look back up at the bell once you have gotten back to the sweep position. Take your time with the turkish get up and think your way through every step. Do not try to rush this exercise, if you do, you will surely pay for it later once you try it with a heavier bell.
The Kettlebell Clean, and Double Clean
Double Kettlebell backswing portion of the clean
This technique got its name, because of how it should be performed: cleanly. The kettlebell clean, much like its cousin the snatch, has a steeper learning curve than the swing or the goblet squat, and you will need to invest an adequate amount of time and dedication into mastering this technique. The clean is a great functional exercise on its own, but is really more important as a transitional technique, setting you up to perform exercises from the "rack" position. The "rack" position is the top or ending position of the clean, where the kettlebell lies on your forearm and your forearm rests on your ribcage, and the wrists are straight. The rack position is also the bottom position of the press, so after cleaning the bell into the rack position, you can then immediately perform a press. This technique is known as the clean and press and will be covered more thoroughly later. But also in the rack position you can perform front squats, weighted pistol squats, rack holds, and a variety of other exercises. All of these techniques are made possible by the clean of course, and that is why it is so important to learn this technique, especially if you want to get serious about your kettlebell training.
Key Aspects of the Clean
Key Aspects of the Clean
- Similar to a one hand swing, with a quick and smooth "uppercutting" of the bell int the rack position
- The bell is kept close to your body during the entire cleaning movement
- Do not death grip the bell, let it rotate smoothly over your wrist, and rest on your forearm
- Finish in the rack position, resting your arm on your ribcage, and supporting the bell with a straight right. This should resemble the bottom position of a kettlebell press.
- Initiate the movement by performing a one-handed back swing
- Forcefully snap your hips as if you were performing a one-handed swing
- As you lock out your hips, begin to uppercut through the bell, the motion of your hand should stay close to your body, the path being similar to what it'd look like if you were zipping up your coat. This means that your hand punches through the bell, and comes up the center line of your body. This could also resemble a "hammer-curl" like movement, but I hesitate to say that because it is powered by your hips, not your biceps.
- Lock out your hips and let the bell rotate smoothly over your wrist as the bell lands in the rack position
The finished rack position
The Kettlebell Press
Push Press & Viking Push Press
The push press is more of a power exercise than a grinding strength movement. This is because you will be using a leg drive to help get the bell locked out over head. This movement is executed typically form the rack position, where you will dip down and forcefully extend your legs letting the momentum help drive the bell up over head into a full lockout. The Viking Push Press however is a strongman classic, but this version has been adapted for kettlebell users. The main difference is that rather than starting the movement from the rack position, you will now start with the bell locked out overhead. The overhead lockout will also be your rest position. The purpose of this is that this overhead position will force you to keep your core tight and maintain proper posture, where as if you are in the rack position you can get away with leaning back and relaxing your core(which you do not want to do for the purpose of this exercise).
Long Cycle Clean and Jerk
As far as bang for your buck exercises go, the long cycle clean and jerk will almost always be your go to exercise when you need to get in a good workout in the least amount of time possible. This movement works just about everything and is incredible for helping you develop power and efficiency. It is a bit more technical the just press and the push press so take your time and practice with a light weight when just starting out.